How to Accept Deposit Payments in WordPress (2 Easy Methods)
Is your business looking to accept deposit payments using WordPress? Follow our tutorial to easily set up deposit payments in WordPress and WooCommerce.

Table of Contents
Your skills deserve to be paid for before the work begins, not after everything is done. But many service providers still find it hard to ask clients for payment upfront.
The good news is that there’s a simple and professional way to do this.
Taking deposit payments doesn’t just protect your business – it can actually lead to a better client experience.
When clients pay something in advance, they’re usually more engaged, give better feedback, and value your time more. We’ve seen this work well for hundreds of WordPress site owners.
In this guide, we’ll show you two easy ways to start accepting deposit payments on your WordPress site. Both methods are client-friendly and give you the financial confidence to focus on doing your best work.

Why Accept Deposit Payments in WordPress?
Accepting partial payments and deposits on your WordPress site offers many benefits for businesses and customers, particularly for people selling high-value products or offering personalized services.
Deposit payments act as a form of financial security. They ensure that your time and resources are not wasted on cancellations or no-shows.
For example, if you are a wedding planner, then requiring a non-refundable deposit is essential to secure your time and resources for the event. You can ask for a deposit of 25% to 50% of the total package cost upfront.
This amount ensures the client is committed while covering your initial expenses, including consultations, venue visits, and vendor bookings.
Additionally, deposits are useful for event-based businesses or long-term projects. If you are hosting workshops, renting out venues, or managing large-scale events, then requiring a deposit upfront can protect your business from last-minute cancellations.
Adding deposit payments in WordPress also improves customer trust and convenience. It provides users with a more flexible payment option, which can make high-ticket purchases or services more accessible.
Having said that, let’s take a look at how to easily accept deposit payments in WordPress. We will be discussing two methods in this tutorial. You can use the links below to jump to the method of your choice.
Method 1: Accept Deposit Payments for Services
In this method, we will walk you through making a simple payment form for receiving partial payments in WordPress. You can use it to accept deposits for subscription services, a single high-end product, in-home services, bookings, and more.
For this, you can use WP Simple Pay, which is the best WordPress Stripe plugin.
We like that it comes with numerous premade payment templates, an intuitive builder, and integrations with many payment providers. To learn more about our experience, view our WP Simple Pay review.
To collect a deposit, we’ll take advantage of the ‘Setup Fee’ option on one of WP Simple Pay’s subscription form templates.
First, you need to install and activate the WP Simple Pay plugin. For details, see our tutorial on how to install a WordPress plugin.
Note: WP Simple Pay also has a free plan. However, you will need the pro version to set up deposit payments.
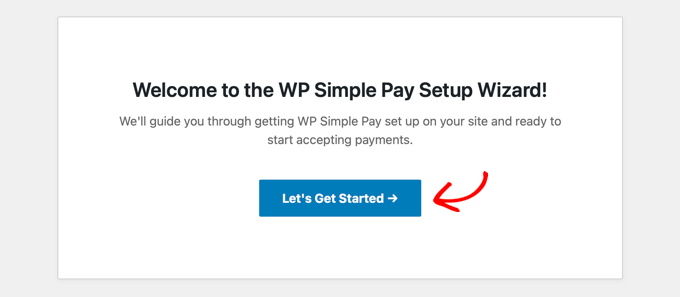
Upon activation, a setup wizard will appear on your screen. Here, click the ‘Let’s Get Started’ button.
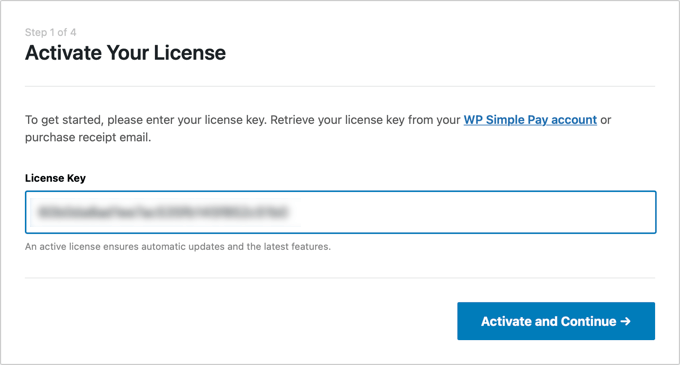
Then, you must enter your plugin’s license key.
You can get this information from your account on the WP Simple Pay website.
After that, you have to connect your Stripe account with the plugin. Keep in mind that since WP Simple Pay is a Stripe plugin, it won’t work properly unless you connect it with a new or existing account.
To start the process, click the ‘Connect with Stripe’ button.
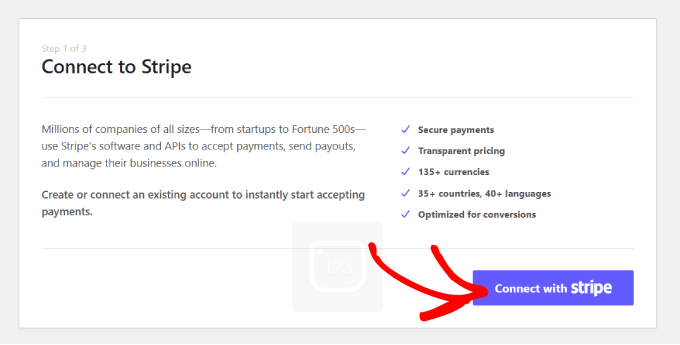
You will now be able to log in to your account. For detailed instructions, see our tutorial on how to accept Stripe payments in WordPress.
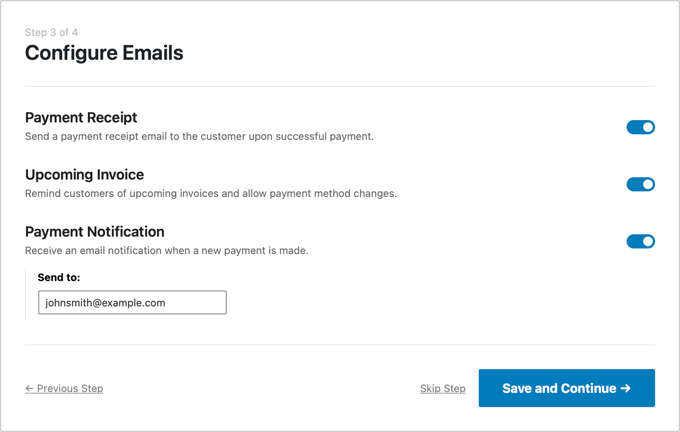
Upon a successful connection, the setup wizard will ask you to configure your emails.
You can enable options to receive email notifications for payment receipts, upcoming invoices, and payment notifications. You’ll also need to add the email address where you want to receive these messages.
Then, click the ‘Save and Continue’ button. You can now complete the other steps according to your liking and exit the setup wizard.
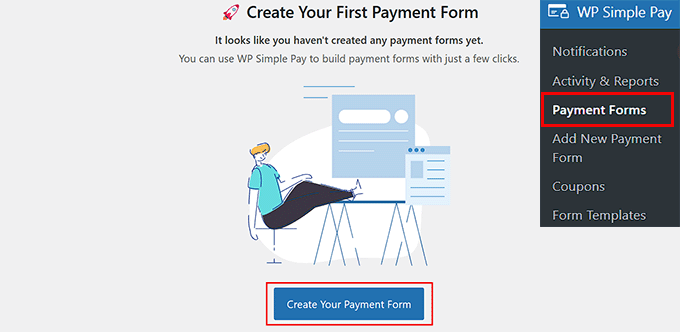
Now, head over to the WP Simple Pay » Payment Forms page from the WordPress admin sidebar.
Go ahead and click the ‘Create Your Payment Form’ button.
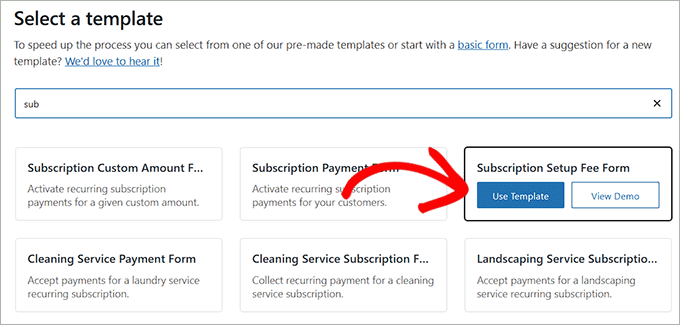
This will take you to the ‘Select a template’ page, where you will see a list of premade payment form options.
Simply locate the ‘Subscription Setup Fee Form’ template and click the ‘Use Template’ button under it.
The form builder will now open up on your screen.
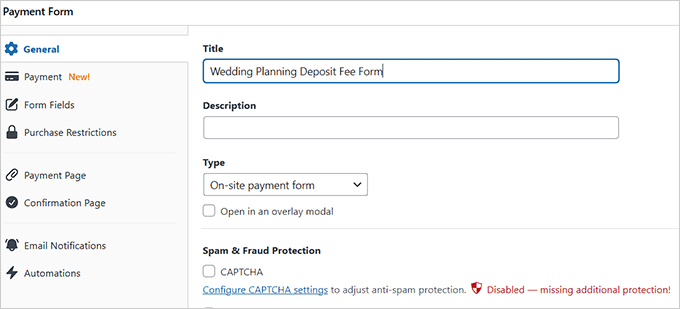
Here, you can change your form’s title and add a description. For instance, if you are a wedding planner and want to accept a deposit fee before the event, then you can change your form’s name to ‘Wedding Planning Deposit Fee.’
Then, choose ‘On-site payment form’ as your form type. You can also check the box under it to turn on spam protection.
After that, switch to the ‘Payment’ tab from the left column and select your preferred tax collection rates under the ‘Tax Collection’ option.
Then, you need to add a price for the product or service you want to sell through the form.
If you’re offering a subscription-based service, choose the ‘Subscription’ option and click the ‘Add Price’ button to include different subscription tiers.
For instance, you can create multiple wedding packages with different pricing.
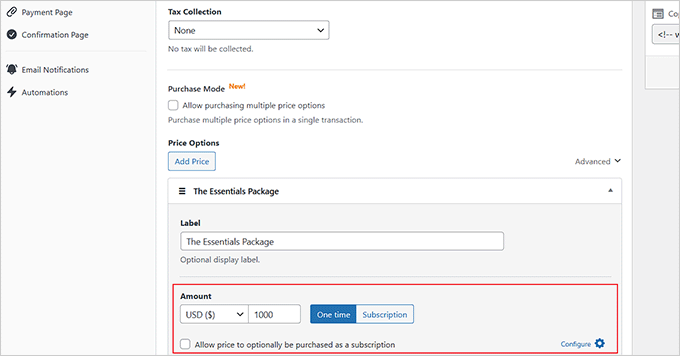
Once you are done, just click the ‘Configure’ link next to the ‘Automatically activate a recurring subscription’ option.
This will open a prompt where you can start by choosing a billing period. This refers to the length of time for which a customer is billed for a product or service. It’s the duration between two billing cycles, such as monthly, quarterly, or yearly. After each billing period, the customer is asked to pay for the next period’s service or product.
For example, if you sell a high-end software subscription with a billing period of one year, then customers would pay once every twelve months for access to the product.
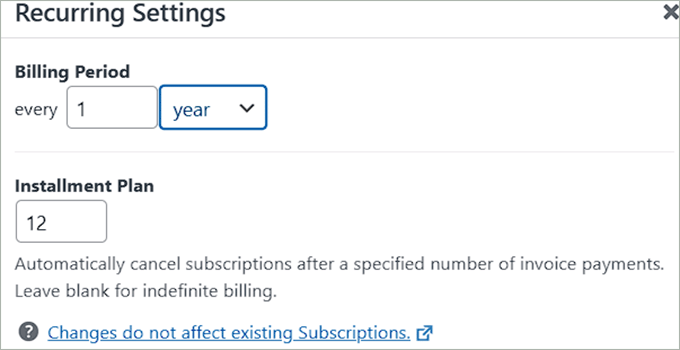
You can also set an installment plan that allows customers to pay for a product or service over time rather than all at once. If you are selling a product for $1,200, you might offer an installment plan where the customer pays $100 every month for 12 months.
Now, you can add a deposit fee for your services or products by adding the required amount in the ‘Setup Fee’ field.
For example, if you are an event or wedding planner, this is the deposit fee users will pay before the consultation and/or before you start organizing their event.
Then, click the ‘Update’ button.
If you have set up multiple price tiers, you will have to repeat this setting for each tier.

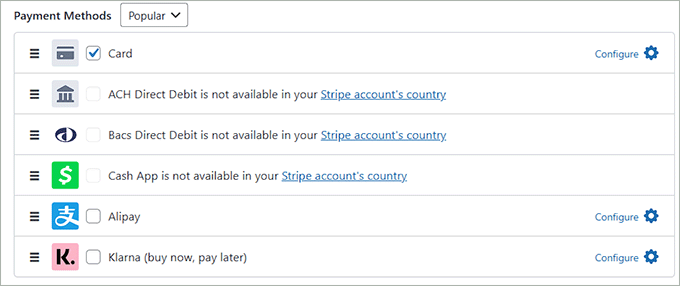
After that, scroll down to the ‘Payment Methods’ section and choose the payment gateways you like.
From here, you can add a card, ACH, AliPay, Klarna, CashApp, and more as a payment option.
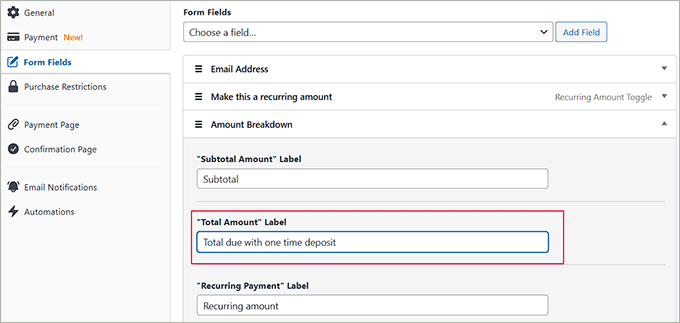
Next, switch to the ‘Form Fields’ tab to add a form field from the dropdown menu. You can also expand the tab to configure each field’s settings and rearrange them using the drag-and-drop editor.
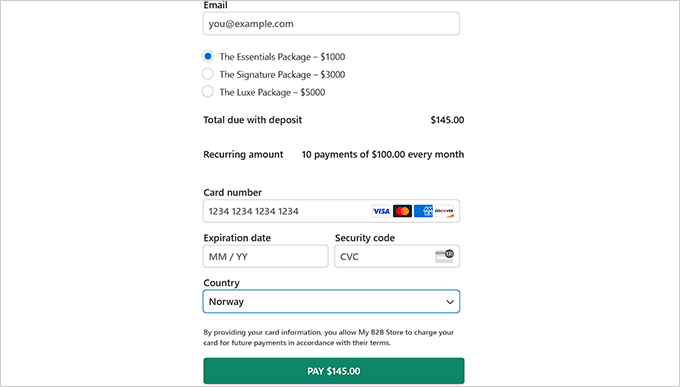
You will notice that the Amount Breakdown field has already been added to your form. This field will clearly display the deposit fee, installment fee, and processing fee to your customers, ensuring transparency.
However, be sure to change the ‘Total Amount’ label to ‘Total due with one time deposit.’
WP Simple Pay will automatically add the deposit amount you choose to the total, but by updating the label, you will make it clearer for the users that the extra amount is the deposit fee.
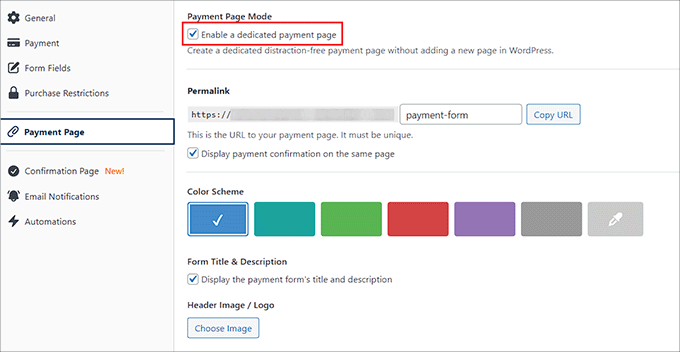
Now, go to the ‘Payment Page’ tab and check the ‘Enable a dedicated payment page’ box. This will allow you to build a custom page without manually adding a new page to your website.
The plugin lets you customize the form by setting a permalink, color scheme, image, footer text, and more.
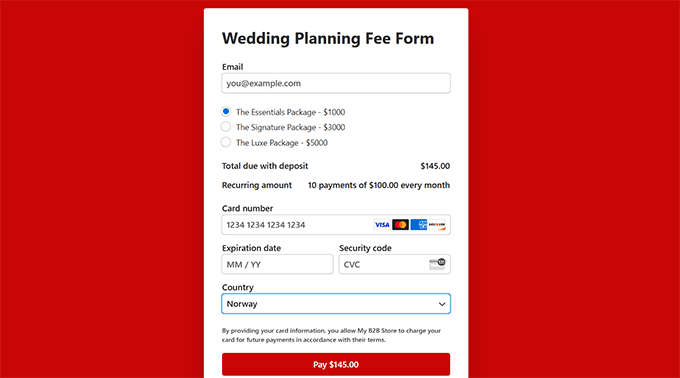
Finally, click the ‘Publish’ button to store your settings.
Then, visit your website to see the form accepting deposit fees.
However, if you want to add the form to an existing page, then you would have to click the ‘Publish’ button after adding the form fields instead.
Next, open the page/post you prefer from the WordPress dashboard and click the ‘Add Block’ (+) button. This will open the block menu from where you must find and add the WP Simple Pay block.
Next, choose the form you created from the dropdown menu.
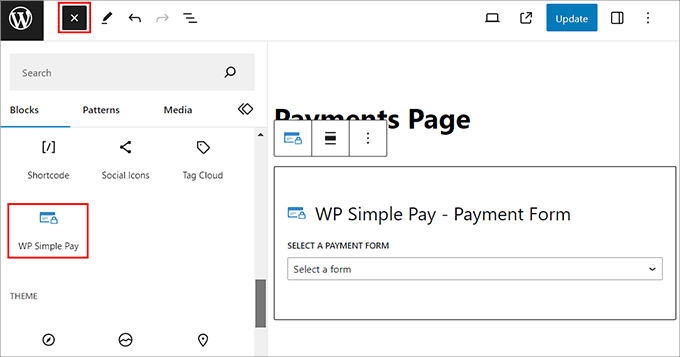
After that, click the ‘Update’ or ‘Publish’ button to save your settings.
Now, visit your website to see the form in action.
Method 2: Accept Deposit Payments in WooCommerce
If you want to accept deposits for products in your WooCommerce store, then this method is for you. This can be helpful if you have high-priced items, custom items, or are simply looking to boost your sales.
For this, you need to install and activate the WooCommerce Deposits plugin. For details, see our step-by-step guide on how to install a WordPress plugin.
Note: WooCommerce Deposits is a premium plugin without a free plan.
Upon plugin activation, you need to open the Products page from the WordPress dashboard and click the ‘Edit’ link for your preferred product.
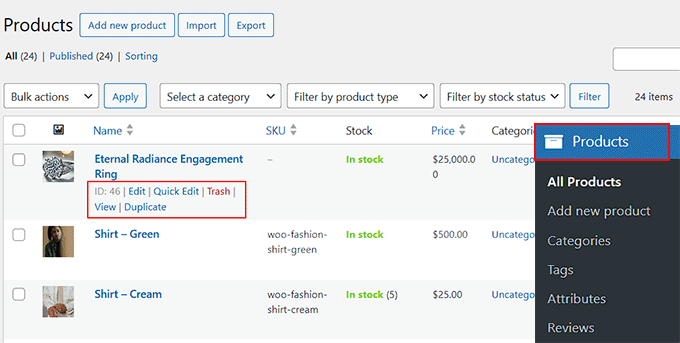
This will open the WooCommerce editor, where you must scroll down to the ‘Product Data’ section and switch to the ‘Deposits’ tab.
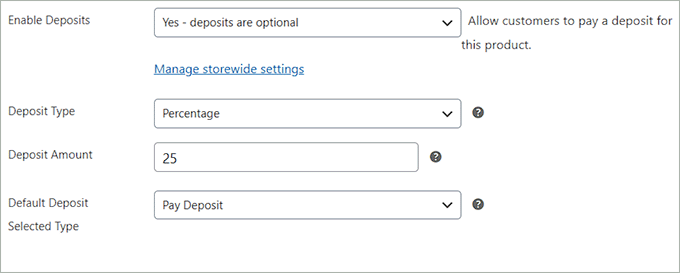
Here, select ‘Yes- deposits are optional’ in the ‘Enable Deposits’ dropdown menu.
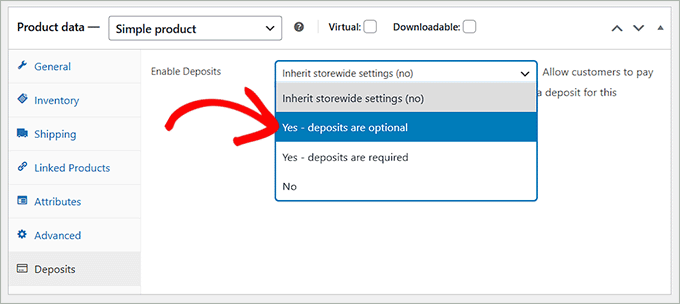
This will open a tab with some extra settings. You can start by choosing the deposit type: percentage, fixed amount, or payment plan.
Once you do that, simply add the deposit amount in the section below. Then, choose ‘Pay Deposit’ as the ‘Default Deposit Selected Type’ to allow users to be able to pay the amount.
Finally, scroll back to the top and click the ‘Publish’ or ‘Update’ to save your changes.
Now, you can visit the product page. Here, you can see that customers can either pay in full or choose to pay the deposit.

Bonus Tip: You can also use the WooCommerce Deposits plugin to set up installment plans for your products. To learn more, see our tutorial on how to set up installment payments in WooCommerce.
Bonus: Offer “Buy Now, Pay Later” to Make Purchases More Accessible
Besides accepting deposits, another way to make your products and services more affordable is by offering a ‘Buy Now, Pay Later‘ (BNPL) option like Klarna.
Unlike a deposit that you collect directly, Klarna is a service that pays you the full amount upfront, while allowing your customer to pay them back in installments.
It’s a great way to boost conversions on high-ticket items.
When customers select Klarna as their payment method, they can choose from several options.
For example, “Pay Later” allows customers to make a purchase and pay for it within a set period, such as 14 or 30 days. Alternatively, “Pay in Installments” lets customers break the total amount into equal payments over a few months.
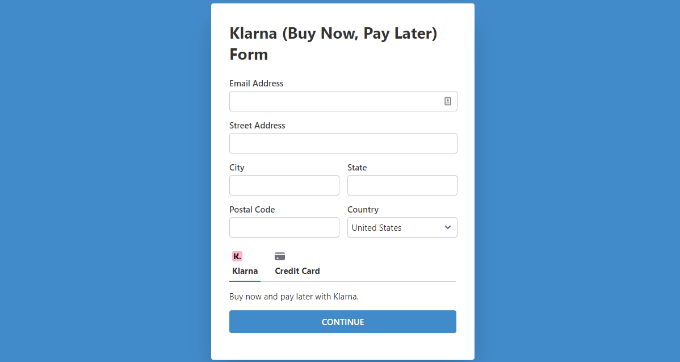
Klarna typically offers these services with no interest or fees as long as payments are made on time, making it a great solution.
To accept Klarna payments in WordPress, you can use WP Simple Pay, which is the best Stripe plugin on the market.
For details, see our tutorial on how to add Klarna payments in WordPress.
We hope this article helped you learn how to accept deposit payments in WordPress. You may also want to see our beginner’s guide on how to add a PayPal payment form in WordPress and our top picks for the best credit card processing plugins.
If you liked this article, then please subscribe to our YouTube Channel for WordPress video tutorials. You can also find us on Twitter and Facebook.
